Introduction To T-shirt Cutting Designs Tutorials.
The Tutorials of T-shirt Cutting Designs are gaining popularity due to the need of people to find innovative ideas to revitalize old fabrics. You can reuse a plain shirt instead of disposing it into trash by making it into something fashionable and interesting. The trendy patterns can be created using only simple tools and a touch of patience and they can be used to show your personality.
This home made style is cost enjoyable. It also promotes sustainable fashion through reusing the clothes that one already possesses. Learning the basics of cutting can give you an unlimited amount of options whether you would like to have a casual summer look or a fashionable statement piece.
This guide will teach you the key tools that beginner designs step by step remedies and tips in order to make your projects successful.
Equipments required to cut designs into t-shirts.
Prior to the commencement of T-shirt Cutting Designs Tutorials compile the proper equipment. The most significant thing is sharp fabric scissors. Sharp edges may be made rough and destroy your design with dull scissors.
Chalk or a washable fabric marker will also be necessary in order to trace out patterns to cut. Symmetry is upheld with the help of a measuring tape. When one cuts something, it would go much easier and more precise on a flat surface like a table.
The optional equipment has a ruler safety pin and cutting mat. Such tools are more accurate particularly in geometric designs.
Selection of The Right T-shirt Fabric.
Shirts are not all created equal insofar as cutting is concerned. The T-shirts made of cotton are beginner-friendly as they are soft and simple to work with. Stretchy fabrics are also good because they do not twist at the edges that provide a clean finish.
Shirts should not be very thin and old because they are easily torn. Dark and solid color is also a good display of the cut pattern compared to busy prints.
Before you start washing, dry your shirt. This does not allow your design to shrink after it is complete.
Short Introduction Cut Back Design.
The ladder back design is considered to be one of the easiest T-shirt Cutting Designs Tutorials to learn as a beginner. Place the shirt on the back side up.
Make horizontal lines in the area of upper back. Allow spacing between lines. Way along the lines being careful not to cut through the seams.
After that carefully stretch each strip using your hands. The fabric will formation will make it curve in a nice ladder shape.
It is a good design in casual summer clothes and ventilates the clothes when it is hot.
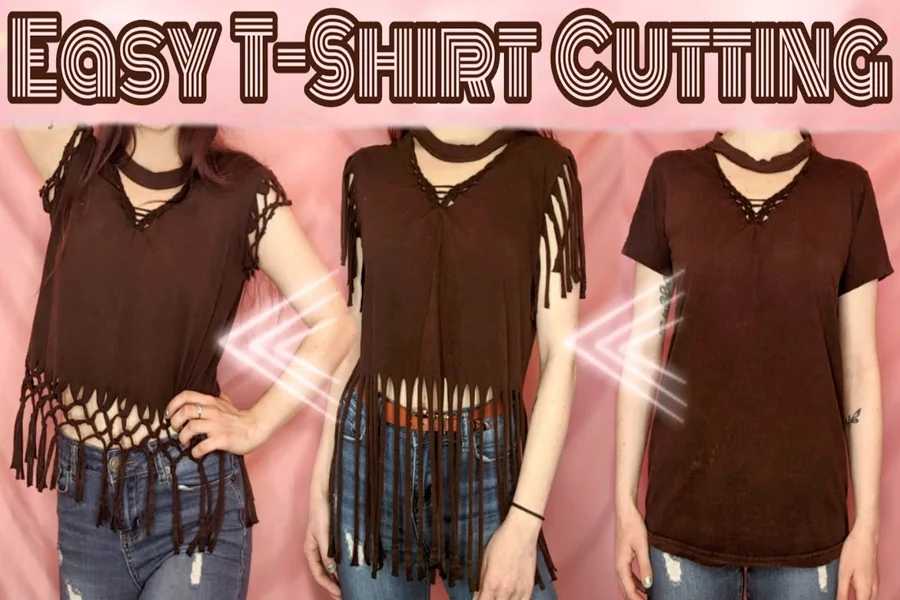
Off Shoulder And Fringe Designs.
The off shoulder look is also another common concept among T-shirt Cutting Designs Tutorials. Make a larger neckline in the collar. Cut slowly so that you do not cut too much at the same time.
To create a fringe design mark, vertical lines are put in the bottom hem. Clip up fairly long strips say two or three inches in length. The ends can also be knotted in order to add texture.
Fringe styles provide movement and suitably any festival or any casual meeting.
It is better to put the shirt on with little changes to make it comfortable and fitting.
Side Knot Designs And Braided Designs.
Slits also give more form and design to loose shirts. Make slits of vertical marking on one seam. Cut the strips and make little knots of the strips.
In braided designs three parallel strips are cut and braid together. Tie the end with a little knot.
Such methods redesign loose shirts in tailored and slimming costumes without stitching.
Patience is important. Measure slowly in order to make the design balanced.
Creative Neckline Patterns
The look of a simple T-shirt can be completely changed upon the design of the neckline. Scoop neckline- trim the collar area in bits. You should always cut little first because you can cut more after.
To make a crisscross pattern, make small diagonal cuts towards the neck-line and cross strips of fabric through them.
A modern edge can also be added with the help of geometric cutouts like small triangles. Draw out shapes with the help of a ruler and cut.
The smooth edges are possible with the help of the gentle pull of the cut areas.
T-shirt Cutting Designs Tutorials: Safety Help.
The first thing should be safety. Sharp scissors must be used and cut away. Hold fingers out of the blade.
Work with a well lit location so that you can see markings. Do not hurry in the process.
In case of participation of children, adult supervision is required. Keep the scissors of the store locked up.
Small cautious steps will make sure that you commit fewer errors, and make your project enjoyable.
Common Mistakes To Avoid
The error that has been shared in many Tutorials of T-shirt Cutting Designs is that the person will cut a lot too fast. You should never start with large parts.
Lack of uniformity in measurements may form skewed designs. Balance, use a ruler/ measuring tape.
The other error would be the failure to put in the shirt cardboard before cutting. This allows accidentally passing through both layers.
You can give yourself some practice before working on your favorite work on an old shirt.
Styling Your Custom T-shirt.
After designing, wear your made shirt with jeans shorts or legging. Cut patterns can be emphasized by wearing over a tank top.
Necklaces or jackets can be used as accessories to improve the appearance. To create the sporty look wear sneakers with your shirt.
Machine washing may spoil sensitive cuts on the hands better than hand washing.
Your homemade masterpiece is the personality to regular clothes.
The reason why T-shirt Cutting Designs Tutorials are trending.
DIY fashion is becoming viral since people appreciate individuality. Tailoring clothes will save on waste and aid in creativity.
The internet social sites present thousands of design concepts that can drive amateurs to attempt their individual ventures.
T-shirt Cutting Designs Tutorials is affordable and easy enough to attract both the students and the hobbyists.
Using very little and little effort you can produce trendy works that shine.
Final Thought
T-shirt Cutting Designs Tutorials provide a practical and easy method of updating your wardrobe. Using simple tools creativity and patience you can be able to make simple shirts into great fashion statements.
Beginner friendly designs will be a great place to start and progressively explore more complicated designs. Measure slowly and cut slowly to achieve maximum results.
DIY fashion does not only concern itself with style. It is concerning the ability to express yourself and get the best out of what you already possess. It will take experience to clean up your designs and make them more confident.
FAQs About T-shirt Cutting Designs Tutorials
Do I need sewing skills for T-shirt cutting designs
No most cutting designs do not require sewing which makes them beginner friendly.
What type of scissors should I use
Sharp fabric scissors work best for clean and precise cuts.
Can I fix a mistake after cutting
Small mistakes can sometimes be adjusted by trimming evenly but large errors may be difficult to repair.
How do I prevent cutting both sides of the shirt
Place a piece of cardboard inside the shirt before cutting to protect the back layer.
Are these designs safe for beginners
Yes simple designs are safe when done carefully with proper tools and attention.
Will the edges fray after cutting
Cotton fabric usually curls slightly instead of fraying which gives a finished look.
How can I make my design last longer
Wash gently and avoid high heat drying to preserve the shape and structure of the cuts.